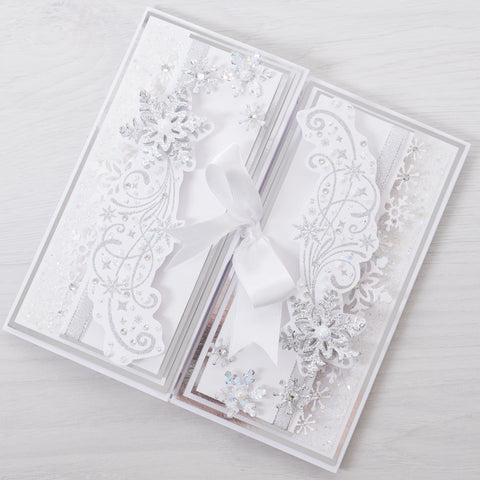
You will need:
- Chloes Creative Cards Swirly Snowflake Flurry Stamp and Die Set
- Chloes Creative Cards Snowflake Border Die
- Chloes Creative Cards - Christmas Sentiment Banners
- Sparkleicious glitter in: Icicle Sparkle and Diamante Sparkle
- Wow powders in Silver Dollar and Metallic Silver Superfine
- Chloes Creative Cards Luxury Pearl Card Crystal White
- Chloes Creative Cards 8x8 Foiled Paper Pad - Crackle
- Silver mirror card
- Clear crystals
- Small clear crystals
- Chloes Favourites pearl bling box
- White satin ribbon
- Chloes Creative Cards Sparkling Silver Luxe Ribbon
- A4 Double Sided Adhesive Sheet
- WOW Clear Embossing Ink Pad
- Chloes Creative Cards 3mm foam pads on a roll
- red liner tape
- Collall 3D glue gel
- Art Glitter Dries clear glue with fine tip applicator
- Die cutting machine
- Guillotine
- Heat gun
- Craft knife
- White 8" x 8" Straight Edge Card Blank (Two card blanks are required for this project)

Instructions:
- Fold one side on each of the card blanks In half. Cut a small slit into the centre of the fold line and thread some white satin ribbon through (enough to be able to tie a bow), and glue the folded pieces together on each card blanks. Attach the two cards together using dries clear glue.
- Cut two pieces of silver mirror card to 3 1/2” by 7 1/2” and glue onto the two panels on the front of the card. Cut two pieces of Crystal White pearl card to 3 1/4” by 7 1/4” and affix using foam pads. Cut two pieces of a double sided adhesive sheet to 3” by 7” and affix. Apply Icicle Sparkle sparkelicious to the sheet and buff in.

- Cut two more pieces of Crystal White pearl card to 3” by 6 3/4”. Using the Snowflake border die cut into both pieces of card. Wrap some sparkling silver ribbon around each piece. Matt onto some silver mirror card, using foam pads, to create a small border. Affix to the card using foam pads.

- Apply crystals to the centre of each Snowflake on the border using dries clear glue.
- Stamp out to of the large Swirly Snowflake Flurry stamp onto Crystal White pearl card and heat emboss using Silver Dollar WOW powder. Fussy cut around. Affix to the card using foam pads.
- Apply dots of glue around the Swirly Snowflake Flurry image and cover in Icicle Sparkle sparkelicious glitter. Add a few more dots of glue and some small clear crystals and pearls.
- Die cut two of the largest snowflakes from silver mirror card and cover in dries clear glue and Diamante Sparkle sparkelicious. Affix to the Swirly Snowflake Flurry using 3D glue gel. Add a pearl to the centre.

- Die cut some of the smaller snowflakes out of Crystal White pearl card and some in silver mirror card. Cover some in Diamante Sparkle sparkelicious and some in Icicle Sparkle sparkelicious. Add to the card using 3D glue gel and add a pearl or crystal to the centre of each one.

- For the inside cut a piece of silver mirror card to 7 3/4” square and affix using dries clear glue. Cut a piece of Crackle patterned paper to 7 1/2” square and affix using dries clear glue. Finally cut a piece of Crystal White pearl card to 6” square. Stamp out one of the sentiments from the Christmas sentiments bannert set into the centre and heat emboss using Silver Dollar WOW powder. Affix to the centre of the card using foam pads.

- Finally tie the ribbon into a bow and trim.

I hope you've enjoyed this beautiful Christmas card tutorial from us today - I can't wait to see all of your beautiful creations so remember to share them on our Facebook and Instagram pages and follow us to keep up to date with all the latest news and collections. Chloe x


6 comments
Such a fabulous elegant card. Thank you for the instructions on how to make it.
Stunning card
This is so beautiful love it ,
Another gorgeous card
Thanks
What a lovely card. Thank you xxx Will have a go at making it xx
Absolutely stunning