Hello Crafters,
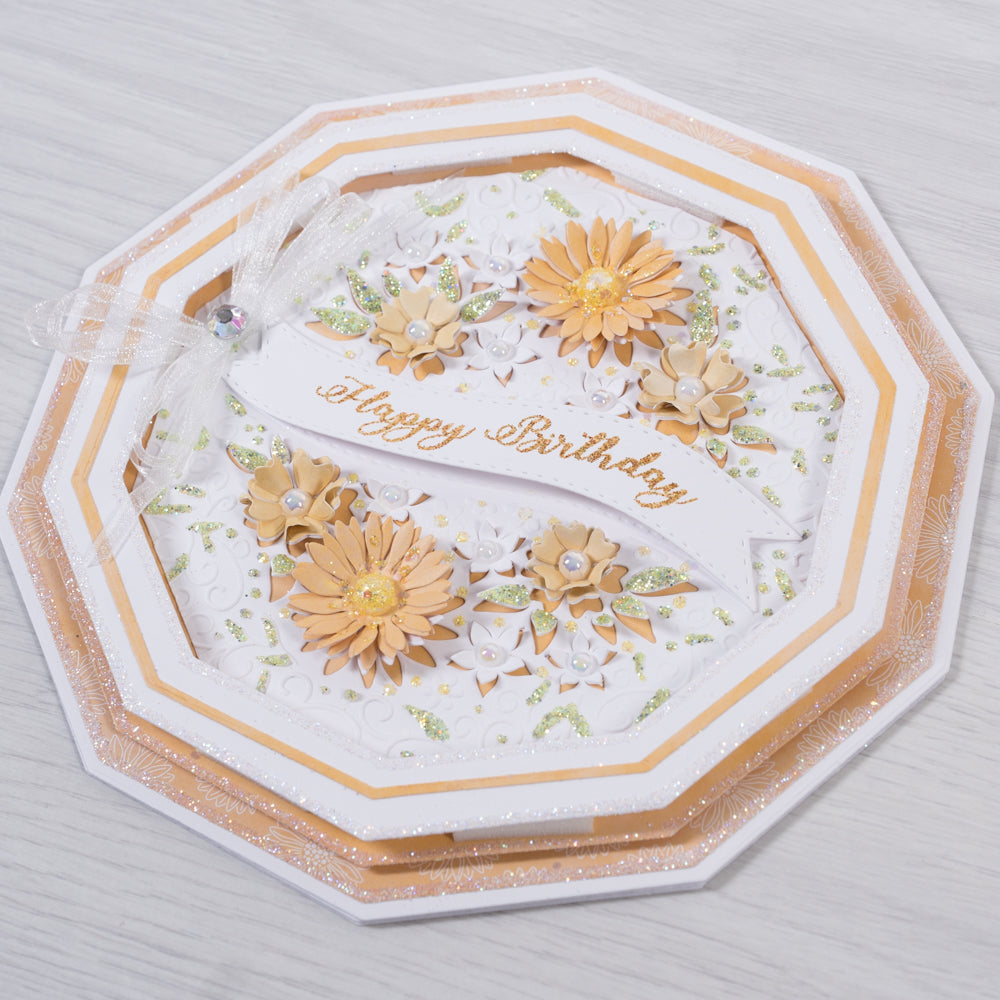
We're bringing you a little ray of sunshine today with this Happy Birthday Card design. This greetings card is the perfect way to brighten up someones day with it's sunshine yellow and orange tones. Be sure to join me on our stamp-a-long tutorial and learn how to use our Metal Die Sets to create this dazzling decagon shaped card!


Materials:
- Chloe Creative Cards 8x8 Decagon Metal Die Set
- Chloes Creative Cards Dancing Daisy Cut and Emboss Folder
- Chloes Creative Cards Sentiment Borders Stamp and Die Set
- Chloes Creative Cards Daisy Elements Stamp and Die Set
- Chloes Creative Cards Summer Meadows Paper Pad
- Chloes Creative Cards Sparkelicious Glitter in Grasshopper, Crystallina and Lemon Drop
- Chloes Creative Cards Chloes Favourites Pearl Bling Box
- Chloes Creative Cards -Chloe's Favourites Bling Box
- Stamps by Chloe WOW Embossing Glitter - Spiced Honey Sparkle
- WOW clear embossing ink pad
- Thin White Sheer Ribbon
- White card
- White 8x8 card blank
- Chloes Creative Cards chisel tip glue pen
- Chloes Creative Cards 3mm Foam pads on a Roll
- Art Glitter dries clear PVA glue
Instructions:
1. Die cut card blank with 2nd largest die from Basic Decagon die set.
2. Die cut another Basic Decagon from white card and affix this to the front of your card blank to create your base card.
3. Die cut next smallest Basic Decagon from Summer Meadows patterned paper, edge using a chisel tip glue pen and cover with Crystallina glitter, affix to base card.

4. Die cut a frame using Decagon dies from white card, edge using a chisel tip glue pen and affix to your base card using a double layer of foam pads.

5. Cut a thin frame from yellow paper using Basic Decagons die and affix to base card.
6. Using the inner waste from your white card Decagon frame, place shape in Dancing Daisy cut and emboss folder and run through die cutting machine.

7. Apply PVA glue to the leaves and cover with Grasshopper glitter.
8. Add dots of PVA glue behind the flowers and cover with Lemon Drop glitter.

9. Allow to dry then, push through the 3D flower elements affix design flat to base card inside the frame.
10. Die cut the daisy elements die from yellow and orange paper from Summer Meadows paper pad, shape petals and overlay onto cut and emboss design.

12. Die cut sentiment Border from white card, dust with an anti static bag.
13. Stamp sentiment using a clear embossing ink pad, cover with Spiced Honey Sparkle Embossing Glitter and heat to set.

14. Affix sentiment to card using foam pads.
15. Tie a triple bow from sheer white ribbon and affix to card as shown.

16. Complete card by embellishing with Jewels and pearls.
Pre Prepped before Stamp-a-Long:
- Any diecutting.
DOWNLOAD THE INSTRUCTION SHEET HERE


7 comments
Just beautiful.
Just beautiful.
Just beautiful.
I really liked this tutorial and some I watched two be this one they also were really good
Really enjoyed your demonstration Chloe . I am looking for some tips for my sister and brother_in_laws ruby anniversary. X
Beautiful card love it
Thankyou for the inspiration
Beautiful card