YOU WILL NEED:
- Merry Christmas Circle die
- Christmas Magnolia stamp and die set
- Extra-Large Circle die set
- Sugared Pastels paper pad
- Sugared Pastels mirror card pad
- Chloe's Favourites Bling Box
- 8x8” card blank
- Sparkelicious glitter – Diamante Sparkle, Silver Crystal, Golden Blush, and Silver Gilt
- WOW embossing powder – Bright White and Mercury Glass
- Chloe’s Creative Cards pearl card – Crystal White
- Silver mirror card
- Acetate
- Pretty Pinks Self-Adhesive Sparkles
- Ranger Victorian Velvet Oxide inkpad
- WOW embossing inkpad – Clear
- A4 Double-Sided sticky sheet
- Foam pads
- 3D glue gel
- Art Glitter Dries-Clear glue
- Die-cutting machine
- Heat gun
INSTRUCTIONS:
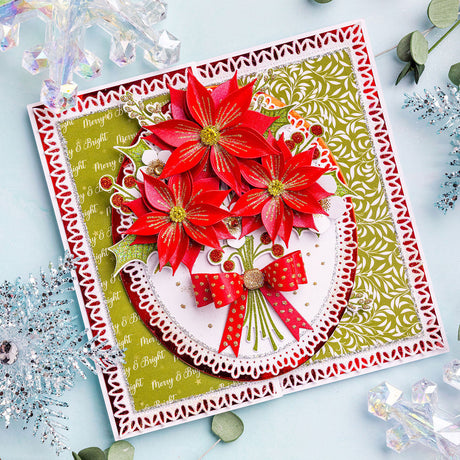
1 Matt and layer pieces of pink mirror card from the Sugared Pastels mirror card pad, Crystal White pearl card (glittering the four sides of the Crystal White with Diamante Sparkle Sparkelicious glitter), and a piece of patterned paper from the Sugared Pastels foiled paper pad. Attach to the main card with foam pads.
2 Cut three smaller matts using Crystal White pearl card (glittering the four sides with Silver Gilt Sparkelicious glitter), Sugared Pastels mirror card, and a piece of Sugared Pastels patterned paper. Layer together and attach to the base card with foam pads.
3 Cover a piece of card with an A4 double-sided sticky sheet. Peel off the back and cover with Golden Blush Sparkelicious glitter and then die-cut using the Merry Christmas Circle die. Use this same die to cut another image in white. Add Diamante Sparkle Sparkelicious Glitter to the snowflakes, snip out when dry, and attach to the Golden Blush die-cut piece with Art Glitter glue.
TOP TIP: Place a piece of copy paper over the top of the glitter-covered sheet before cutting as it stops all the glitter going over the die cutting plates. If you glitter first then die-cut, you get sharp edges on the image, especially when cutting chunky glitter.
4 Using the Extra-Large Circle die set, cut three different size circles: two in Crystal White pearl card and one in Sugared Pastel mirror card. Attach the Merry Christmas die-cut piece to the small white circle, layer onto the Sugared Pastels mirror card, and attach using foam pads to the larger white die-cut piece, glittering around the edges of this one with Silver Gilt Sparkelicious glitter, and secure onto the base card with foam pads.
5 Stamp, heat-emboss, and die-cut the Christmas Magnolia petals onto Crystal White Card, using Mercury Glass embossing powder, then colour with Victorian Velvet Oxide ink. You may find it easier to leave the flower in the die and then colour if using Oxide ink. Attach the petals together and add Silver Gilt Sparkelicious glitter. Die-cut the stamens in silver mirror card and decorate with jewels from the Favourites Bling Box and Pretty Pink Self-Adhesive Sparkles, then attach to the middle of the flowers with Pinflair or Art Glitter glue.
6 Stamp, heat-emboss, and fussy-cut the foliage from the Christmas Magnolia stamp and die set onto acetate using the WOW Bright White embossing powder. Turn the images over and glitter the back with Art Glitter glue and Silver Crystal Sparkelicious glitter. When completely dry, attach the foliage and Christmas Magnolia flowers to the main card using Pinflair glue. Finish the card by placing jewels from the Favourites Bling Box onto the glittered snowflakes.


