
I've been holding on to sharing this card on the blog for a little while as I was waiting for the stunning Summer Meadows paper pad to come into stock! Just look how beautifully the colours work on this project all mixing and matching together, I just love this project that Glynis has created.
What you'll need to make this project -
- Chloes Creative Cards Metal Die Set - 8x8 Fancy Ovals
- Stamps by Chloe Spring Foliage Clear Stamp Set
- Stamps by Chloe Clematis Stamp and Die Set
- Stamps by Chloe Happy Birthday Sentiment Stamp Set
- Chloes Creative Cards 8x8 Summer Meadow Paper Pad
- A3 White Card
- A4 White Smooth Card
- Chloes Luxury Pearl Paper Vista
- WOW Metallic Silver Superfine Embossing Powder
- WOW Opaque Bright White Superfine Embossing Powder
- WOW Clear Embossing Ink Pad
- Sparkelicious Glitter Skys the Limit
- Heat Resistant Acetate
- Jewels
- Die Cutting Machine
- Heat Gun
- Collall 3D Glue Gel
- Art Glitter Dries Clear Glue
- Foam Pads
- Score Board

How to make this cardmaking project -
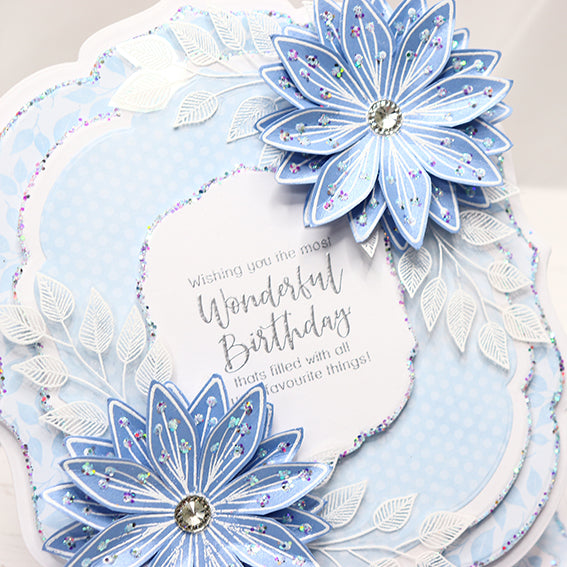
- Score and fold the A3 card in half (21cm on a large score board) place the largest die from the set sideways (not upright) just slightly over the fold in the card and die cut, turn the card now upright and score across the middle from point to point and bring forward attaching double sided tape to this forward part only, using the same die cut another white piece and attach to where the double sided tape has been put.
- Using the second die in the set cut two different pieces of colour paper from the Summer Meadows Paper Pad (these can be put together to cut at the same time), glitter the edges with the Skys the Limit Sparkelicious, attach the one to the front of the card with foam pads and the one for the bottom with double sided tape.
- Using the fourth die in the set die cut two white ones and the fifth die cut to patterned ones from the Summer Meadow Paper Pad. Glitter the edges of the white die cuts with Skys the Limit Sparkelicious mount one onto the front of the base card with foam pads and the bottom one with double sided tape and then mat and layer on to the top of these the patterned ones using double side tape.
- Stamp and heat emboss the sentiment in WOW Metallic Silver Embossing Powder and die cut with number eleven die in the set, glitter with the Skys the Limit Sparkelicious and attach to base card with foam pads.
- For the little step on the bottom of the card die cut number nine in white, cut in half and the glitter as before, when dry attach with foam pads.
- Stamp, emboss and die cut the Clematis in Bright White Embossing Powder onto Vista paper, glitter the petals and assemble placing the jewel into the middle.
- Stamp the leaves from the Spring Foliage Stamp set in Opaque Bright Embossing Powder and fussy cut, arrange the leaves and flowers onto the base card and secure with Collall Glue Gel.
Is this a project you'll be recreating at home? We would love to see your makes in the Stamps by Chloe Facebook Group.


1 comment
Lovely card thank you